I needed a hat in a hurry for my Revolutionary War kit because I bumbled around and ran out of time to order one. About 6 months ago, I'd had an idle thought about looking for woven straw mats when big-box retailers had them out for summer for the purpose of using the straw braid to make a hat or bonnet. Pretty lazy, right? It turns out, I'm even lazier than that. Instead of re-shaping the straw braid or doing something clever, I just, you know, sewed some crap to a mat.

Courtesy of Wal*Mart.com
I waited until the *last* minute, went to a Wally World near the house on the way home from work, found the mat pictured above (only in a "natural" lighter brown color) and took two home. Around 11:00 I started fussing with it and at 12:30 I had this:

It's a Mat Hat! And I'm the Mat Hatter... Pardon the hideous cell phone picture.
The trim is all 100% polyester satin ribbon. I used a full spool of the green and another of cream ribbon. (The cream was called "sash ribbon" and there wasn't much on the spool.) For the trim on top, I alternated 1" box-pleats along the edge, sewing them down with a single running stitch through the center as I pleated. The ribbon just naturally (however natural polyester can be) "popped" up into the lively figure-eights on either side of the stitching. I needed to fake the look of a crown to my "hat" so I gently sewed the remaining strip of green ribbon in a circle at the center top, twisting it gently every two inches or so to create "puffs" in the material. This gives me a little bit of texture in the right place, though it's not exactly convincing.
My instinct on the wide cream ribbon was to secure it across the top of the hat so that the sides would be pulled down into that characteristic "shovel" shape around the face. But you know what? I didn't find a single 18th century image (cartoon, painting or engraving) showing a ribbon like that on top, nor do any of the surviving hats that I was able to locate. There were two paintings which showed women whose hats were clearly tied from the top with what looked like lengths of fabric or shawls, but not ribbon. Has anyone else seen an 18th century depiction of the ribbon being used to shape the hat from the top? I'm sure they're out there, but I never did turn anything up.
So this led to the ribbon being stitched to the inside center and outer edges, as seen on this hat:
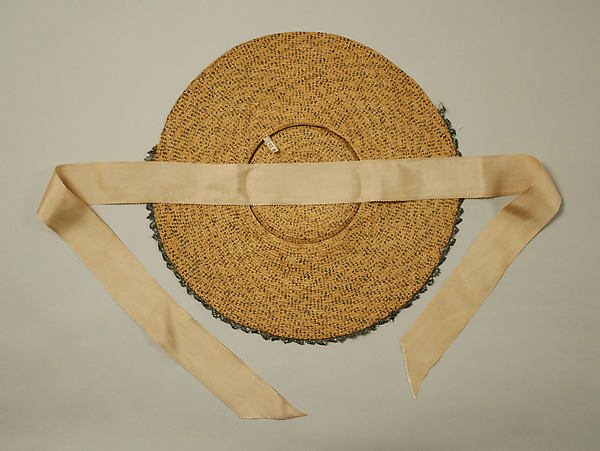
Metropolitan Museum of Art. British, 18th century.
I had a teeny scrap of the cream left over from evening up the ties. I tied it into a simple bow and sewed that to the back of the hat, under the brim. The bow is visible when the hat is worn with the back angled up. (That angle is not sewn into place. The tension from the ribbon ties keep the back flipped up.) Plus, the little white bow looks like bunny ears from the front:

Why do I look this smug? Because I love my bunny ears.
So in the words of a creepy magician: Ta-Daa!
I didn't trim the hat any further because A., I ran out of ribbon and B., I didn't really know where to go from here. It seemed like adding much more would only call attention to the non-hat aspects of this fine piece of millinery. I wore it over a plain white linen cap, some acne and some trashy red hair.
And thus ends the saga of the Quasi-18th Century Place Mat Hat. Was this passable? I don't know. Maybe at 30 paces. But it was fast, fun to make and it didn't attract negative attention from anyone dressed better than I was, so I'll call it a win for now. At the very least, it gave me a chance to practice sewing flotsam to a place mat, which I think we can all agree is a skill that most people desperately need.
HAHA I definitely have the willpower of a sloth sometimes. Or a grizzly bear in 90 degree weather. The poseur-hat turned out beautifully though, although you're a lot LESS lazy than I am when it comes to ribbon...I woulda just slapped one bow on that sucker and called it a day. I'd love to try the box pleating to get that poofy look some time. Brilliantly, slapdashily done...two sloth-thumbs up.
ReplyDeleteThe only reason that box-pleated trim happened at all was that it was fun. Sort of addictive, even. But just to warn you, I don't think it will work with classy ribbon. I'm pretty sure the polyester is pulling some serious weight in the poufage. I say this, of course, knowing that you only ever use classy ribbon.
ReplyDeleteIf by "classy" you mean "cheapest of cheap Walmart selections" then BINGO! :D
DeleteBrilliant! I am stealing this because I have an abundance of poly ribbon left over from someone's wedding and old placemats everyone gave me as housewarming gifts that I will never use. This is perfect!
ReplyDeleteI don't know about brilliant, but I think it's high time more people wore placemats on their heads. By the way, the recent post on cycles of fashion (mid-17th to mid-19th) was epic! Well done and totally mind-blowing.
DeletePlacemats hat are grat. I have made one too, though I covered mine in fabric. :) Yours look very pretty!
ReplyDeleteThis comment has been removed by a blog administrator.
ReplyDeleteI made your hat, it turned out great, thanks for the idea. :)
ReplyDeleteHey, thanks! I'm delighted that you got some good out of the idea. I followed your name here to your blog/website, and WOW! Your version turned out beautifully! I love the elegant shape you achieved, and the feathers are excellent. You are now officially in the Guild of Mat Hatters. :)
Delete