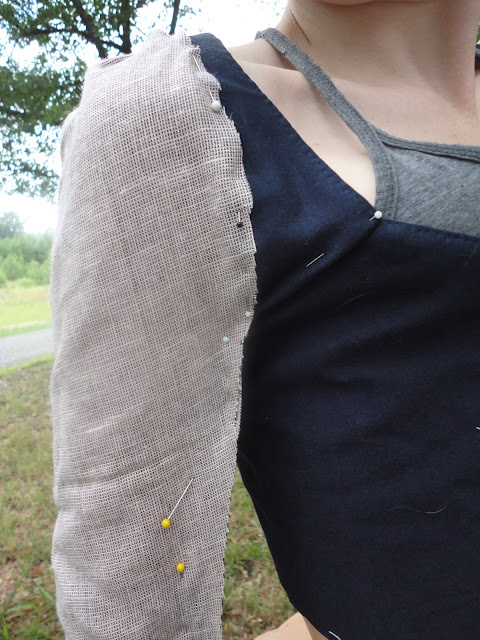
Interior bodice shot. That's leftover pink checked cotton from making a baby smock for "A" from the Jehossee project.
So this round-gown project was suspicious from the first because everything went really well for the first two weeks. So much so, that I began to do that Really Bad Thing that people do when they stop sensing impending doom:
I relaxed. A little. And quite worrying because after all! It was coming together so well! And all that!
But then, sleeves. I don't think I've had such trouble with sleeves before. SEVEN sleeve mock-ups, all failures. I hit the wall on the sleeve issue the week before the Great Valance Box Menace of 2012*, but I had to get back to it because I needed to finish the gown.
* Tomorrow. Or soon after.
Pardon the cat hair and thread fluff. The dress is basically a navy blue lint trap.
The above pic is one of the first irritating mistakes. The mock-up fit *perfectly.* But the same sleeve cut out of the fashion fabric? Nope. I don't pretend to have great sewing skills. As much as I love the 18th century, I've had far more experience in 19th century hand-sewing in the past year. So basically, I have no idea what I'm doing. And boy, does it ever show.
The final sleeve mock-up came about on Friday and was the product of a lot of alterations to dress and sleeve both. See the white pin on the bodice (below)? That "strap" across the shoulder was originally cut as one piece with the bodice. (It's the same Janet Arnold pattern that everyone else has made a thousand times). I had to create a fake seam there in order to move the strap into a more vertical position. This allowed the shoulder of the sleeve to have a bit more room and took some of the wonky angles out.
More cat hair! Yum!
Most of the round-gowns that I used for reference had a seam at that precise area of the bodice. (Most of the front-closing gowns in general seem to as well.) So I don't feel so weird about it being there, but it was still kind of a disappointment after the earlier success. After pinning out the excess, re-fitting, re-trimming and then re-fitting again, I cut my final *final* sleeve and lining:
Internet: meet BatMan.
And then my cat laid on it. Because how else is all that cat hair supposed to get on the gown?
The sleeve lining is unbleached osnaburg, also left over from good ole Jehossee. The scrap bag will be taking me back for years to come, I suspect...
At some point along this juncture, I decided that I didn't want to make a round-gown after all. My reasons are obscure, especially to myself, but there you have it. The gown morphed into a quarter-back anglaise, which is possibly sort of farby when executed in linen. (Or possibly not... it sort of depends on whether the fashion of quarter-back gowns was borrowed from peasant/ lower class clothing or if it was developed spontaneously amoung the elite, I guess.) So instead of arranging the skirt panels in a characteristically round-gown fashion, I closely pleated them into the back half of the bodice.
Which I didn't take any pictures of it seems. So here's more construction pics of the bodice:
The panels forming the gown bodice were completely finished (lining mounted to exterior fabric) before they were joined together. I used the Costume Close-Up le point a rabbatre sous la mains stitch for the finishing. The panels were then whipped together:
...with green thread. Because that's how I roll. I think I need to adjust the panels a bit and add some boning chanels to help with wrinkling, but otherwise, the round-gown that grew up to be a quarter-back anglaise is done!
I know, I know... the petticoat is too long. I didn't feel like hemming 3 petticoats last night. Cut me some slack. And just in case anyone feels concern about the patterned petticoat with the solid-colored dress, it's okay. I feel pretty good about it.
Just in time for the week o'18th century dress. Today was the local annual roast of Banastre Tarleton and the first of the three 18th century events of the week. Tomorrow night is a local book signing for a fantasy novel set in 1765 Boston (yes, yes, the dress is 1780s, but what do you do?) that I intend to dress up for, and then Friday I'm participating in a gown workshop at a cultural museum one state over.
And I made my hat out of a place mat. True story.


Well shoot, you pulled it off beautifully in the end! You and are I are/were experiencing the same problems (exactly, EVIL SLEEVES), but you have succeeded and I'm still having issues. Your finished gown looks absolutely marvey. Very well done :-)
ReplyDeleteYou are being VERY generous with the praise there. :) Your stripey dress is going to be incredible! I secretly suspect Janet Arnold is laughing at all of us from the grave, though...
ReplyDeleteLOOOOVE IT. That is a gorgeous picture and I am adoring the placemat hat. Also in love with the patterned petticoat, fabulous. I always want to do a patterned one but my gown fabric always tends to have stripes or something and there's only so much mismatching my 21st century brain can take.
ReplyDeleteAlso, yes, I think Janet Arnold was a secret historical fashion saboteur. My pink gown came mostly from one of her patterns but with about a bazillion internal alterations and many many tears and expletives. I'm working on an en fourreau right now and I REFUSE to open Patterns of Fashion.