Showing posts with label stays. Show all posts

Monday, March 3, 2014

Pull up a busk and stay, why don't you?


Fresh from the killing fields of "research," our heroine appears! Resplendent in some bodacious polished cotton fabric that was probably rejected from the set of "Golden Girls", she demonstrates her abundant charms to the masses.

Bask in the glories of imperious glances and awkward selfies!


Come, my children, into the liiiiiiiiiight....

Dazzle your senses with an alluring up-cup shot of wrinkled fabric and load-bearing 1980's Waverly calico!

Why, hello.

Relish the bewildering confusion of yet another shot of No Bosoms, featuring an enticing peak at the hoarder-style pile of mess accumulating in the corner!

Most of that is my Goodwill pile, I swear.

There are a few important points I'd like to make:

1., These pictures are a bit on the "gently aged" side. Honestly, I think they are over a year old. That's significant because...

2., I'm a whole lot better at drawing my eyebrows on now! And...

3., I've since added bust gussets to liven things up in the Balcony seating, if you catch my drift.

I have no need for 1820-1840 stays, but I wish I were the kind of person who needed them, so I'm making them. It's the Kevin Costner in "Field of Dreams" approach to sewing. "If you elaborately plan, and then poorly execute it, logic will give way to miracles and invitations will coommmme..." Since there isn't precisely a pressing need for this type of garment, I decided to go for broke and make them as versatile as possible. Ideally, they will at least cover me from late Regency- late Romantic.

This was the intended target:

                            Corset
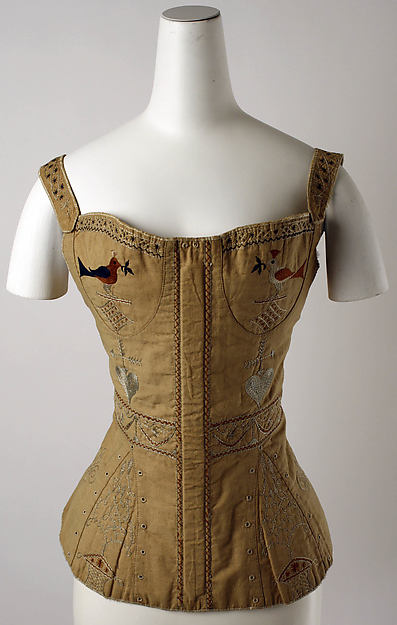
Via the Met, home of the Super-Famous Lusciously Embroidered Stays

The mock-up stays that I'm wearing are overall pretty solid in the fit department. The wrinkles at the waist are 99% the result of the incredibly graceful angle from which the picture was taken, and the length and bust height are both good. My original intention was to follow the "pattern" of the inspiration stays as much as possible. But... (there are always buts, even when you think you're just dealing with busts) the original cup design just wasn't working for me. Frankly, it was kind of amazing. I have the same voluptuous curves of a yard stick. What were the chances that I'd stumble upon a bust-cup design that wouldn't leave me enough room?? 

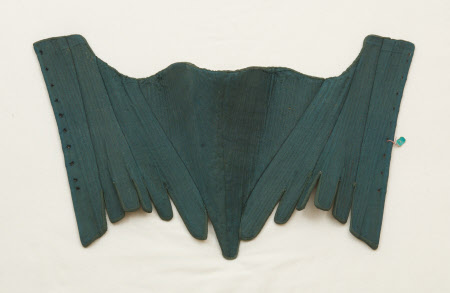
But, there it is. I agonized over it for a while, and finally decided to deviate. After all, my natural waist is *ha ha haaa ha sob* nowhere NEAR the position of the band on the inspiration stays. Then, I found this lovely pair...

                                  Stays
I feel as if we've Met before...

...and I'm pretty sure that they are better suited to MY lovely pair. (har har) Though my need of a bust-gusset does not extend to the range of twosies, this pair of stays was clearly made for someone with my gawky, high-waisted mutant proportions. The plan is now to marry elements of the two stay models, which will probably result in something like this:


The duck-billed platypus of the Historical Costuming community, if you will.


**I have no idea what heinousness has been perpetrated on Blogger over my absence, but suddenly, it's practically impossible to get pictures centered (see most of above), and I have no control over that huge gap at the top. Weird. 

Sunday, July 7, 2013

Leather Stays Again!

From the Summer 2012 Thread-Headed Bust-or-Bust Collection, we proudly present yet another pair of leather stays! 

(I'll quietly wait here as you drool over my contorted flesh.)

Mmm... Squozen.

I pretty much continually obsess over leather stays. That's normal, right? I think about them more than I think about housecleaning (har!) or eliminating my increasingly obvious mustache combined.  (Not that there is much else to do here in the great state of "93% Humidity" in the town of "Flash-Flood Warnings Since Monday.") And yes, you read the "2012" correctly at the top. I cut these out almost exactly a year ago, and haven't gotten around to posting about them til now. Please feel free to make up your own excuses for me; I've grown weary of providing my own.

Construction and tools are pretty similar to my very first pair, except that I used the previous stays as my starting pattern rather than going back to Drea's Elizabethan corset generator. After more than a year of use, I had a pretty good idea of the changes I wanted to make. The most obvious change is, of course, the front-lacing action. I wasn't sure that I cared for it in theory or practice, but I wanted the experience. Now, I'm a convert to the style. These are SO much easier to get on and off.

And for the record, yes, they do lace closed in the front. This was a quick n' dirty photo shoot out in  the driveway. While you're at it, please ignore the shoestring lacing. 

I changed the shape quite a bit as well. These are shorter, with a wider top and narrower back. The hip tabs flare out much higher than the original pair and the front "tummy panels" bow out slightly due to the changes I made to the hip area. Consequently, these are more flattering for the silhouette of 1780-1790(ish) styles than earlier years'. The decorative cutting on the outside surface was the product of idle experimentation more than historical accuracy or academic research. 

What works: 
* The front (and back) lacing. Adjustment, ingress and egress are vastly improved over the original set of leather stays.
* The changes to the silhouette. My movement (arm rotation, mainly) is much better. 
* I used a thinner leather this time around, around 8 oz.. I was concerned initially that I'd lose support, but the weight of the leather is excellent and flexibility is improved. I doubt that I'd recommend using anything much thinner for this style, but meh? More experimentin' is needed. 

What didn't/doesn't work:
* R.I.P. shoulder straps; I knew ye not. These were initially cut with shoulder straps rising from the back panels, to be secured to the front on either side of the bust.The straps were technically functional, but they were annoying and created weirdness under every garment I own. Two flicks of the knife later, they annoy me no more. I probably won't attempt to cut straps into the body of leather stays again. Piercing the leather (front and back) and cutting separate, floating straps is much easier and potentially adjustable. 


I'm in the midst of two new pairs, one of which is based on an item in the Nordiska Museet collections. Hopefully at least one of those will be finished before the end of the year. (Not that you'll see them, of course. At the rate I'm currently finishing projects and posting, they should go "live" on the blog sometime in  2022.)

Tuesday, January 31, 2012

Simple Stays: Leather Stays Tutorial, Part 3 (Final)


We're in the homestretch! If you missed the first installments, they are here and here

By now, you have something that qualifies as a pair of leather stays. A bit rough around the edges (literally) and probably smelling heavily of cow (yeah, it's LEATHER) but they are stays none-the-less, and they are yours. 

No binding necessary. 

The last leg of this truly amazing and rewarding journey is the finishing touches and final adjustments. First, get thee into thine stays! Stays generally (though not always) lace in a spiral pattern from the bottom to the top. You will literally be lacing them UP. For fitting purposes, lace them exactly as you plan to wear them.

This is a good time to address any rubbing/poking/uncomfortable areas. (As opposed to later, when you're dressed at an event and suddenly realize you can't move your left arm because your shoulder blade is trapped under your boob, or whatever.*) Stays are meant to shape the body, not constrict it horribly. Leather stays in particular were worn to be worked in. You should be able to move and bend reasonably. Don't expect to be able to do gymnastic back-flips, but make sure you have a pretty full range of movement.

* If this actually happens, please take a picture and email me. Then see a doctor. 

If the fit is good, pay attention to the "look" of the stays next. See if there are any areas where they could use additional shaping or trimming. 


The above picture was taken the night I cut the stays out and laced them for the first time (cotton cord for fitting, 1/8 linen tape for usual lacing). You can see how high the back rises above the front bust line, despite the fact the stays are resting at an angle. High-backed stays were more common early in the 18th century, but it wasn't working for me. I cut two inches off of the top of the back panels, including the top lacing holes, and tried them on again. After wearing them off and on for a day, I decided to create a wider gap in the back (they nearly closed when I laced them) and improve the fit by cutting the back edges flush with the original rows of holes on each side. This, of course, required the creation of new lacing holes. Ultimately I also trimmed the tabs and slightly deepened the under arm area on each side.

Un-lace your stays and lay them flat. Using a handy-dandy bevelling tool like I used or even the side of a razor blade, trim the rough and uneven edges of the leather, front and back, inside and out, several times. After this, it's time for decorating!

Leather stays were traditionally scored in vertical lines to encourage flexibility. You can sketch boning channels on your leather just as you would for a pair of conventional linen, wool, silk or cotton stays and score the lines with your razor, or you can come up with something wacky and original. Since I am a boring person, I went with the "faux boning" look:


I went over some of the "boning" seams and around the tabs with a wartenburg wheel to give the look of stitching where I fancied it. 


My theory on decorating leather stays is that women probably carved their initials, or whittled decorative patterns, etc. whenever they could and as they desired. Consider some of the extraordinary (and superfluous) stitchery perpetrated upon stays of the 18th and early 19th centuries... Obviously, women took pride in exercising their decorative and creative abilities at every level of society. (And on just about any unsuspecting garment.)

That said, I have done precious little decorative work to my own leather stays, other than what I mentioned above. Some of that decision was born of fear and some was practical. As I made them and through the series of trims and small adjustments that followed, I was concerned that I would have to cut into and interrupt an existing design during a future modification. So I kept it simple. I'm at the point now where I feel that they fit me well, and so I plan to use knives and stamps to tart them up a bit at some point in the future. 

The interior:

Boob sweat patterns!

A few words on fitting and wearing them the first few times: sweat is your friend. The leather will become more supple with wear, allowing the stays to mould and shape to your body better with time. The first couple of times you wear them, spritz the inside with water to expedite the forming if you wish. 

Weird angle, but you can see how the front has bowed and the tabs curve up and out.

And that's it! Obviously, this is a tutorial best suited for people who have no interest in using an existing pattern. But it's important for the reluctant leather stays initiate to know that it can be done without a pattern. 

Things I would do differently next time:

* I would use a thinner leather. 8-10 oz. rather than the 12ish that I used. It gives fantastic support, but it's really a little over-kill for stays.

* The great lacing-hole debacle. I know better now. (See Part 2 for dirty details.)

* Lacing material! I have been using 1/8"-1/4" Dutch linen tape to lace them and I keep breaking the laces. I've gone through 4 in a year, and I don't put the stays on more than once every week or two. I've come across some better information on stay laces since I made these, and I intend to investigate other options.

* Not really a regret, but something to note: If you're used to pinning things to your stays (kerchief/gown/stomacher/whatever floats your boat), keep in mind that it's harder to pin to leather. 


Thanks for checking this out! If anyone has any question about things I didn't address, please let me know. I will be happy to clarify whatever I can. Happy Stay Making!

Leather Stays Tutorial Part 1

Leather Stays Tutorial Part 2

Sunday, January 29, 2012

Simple Stays: Leather Stays Tutorial, Part 2

Ready kids? Okay!

When last we were gathered together, this is what we had:


Sometimes, words aren't enough.

As I mentioned previously, my material was a thick n' fabulous faux-suede left over from an upholstery project. I was able to transfer the entire pattern onto the suede without piecing the material, which is ideal. Since the final stays will be cut from a continuous piece of leather, this allows me to recognize any obvious issues with the fit.*

* If you plan to make your stays front AND back-lacing, then obviously, your material should be prepared in two pieces (or more) for the mock-up. There are a pair of child's leather stays in What Clothes Reveal that are adjustable in the front, back and at both sides.

You can see here some of the remaining lines from adjusting my paper pattern:


 I don't know why I'm barefoot in all of these. Really.

Everywhere that I felt a little insecure about my lines, I left extra material. You can always trim! At this point, I basted a small pocket at the base of the front center and marked the exact center of the stays, where a busk would go if you were to legitimately use one. Not that I know how to use a busk illegitimately, but...

Then, just like a Viking, stick the busk into the pocket, line it up and secure it with some highly suspect zig-zaggy basting. I marked the lacing holes and used the awl to pierce the material and widen the holes.

If you listen closely, you can hear the busk quietly weeping.

I don't have any pictures of the next part (be grateful), but basically I tried it on, laced it securely using the large needle threaded with string, and made notes on the fit. For me, the main issues were the height of the back (too high), the tabs (too long) and the overall width (a bit big). I treated the mock-up just like the paper pattern; I tried it on, marked it and fitted it several times.

See the peaky-pointy things on either side of the busk? I used those to orient the stays as I tried on the pattern and mock-up. I knew where I wanted those to hit on my body, so as I made changes to the fit, I had a visual reference.

Time to hack up some leather!


It puts the lotion on its skin...

Once you've had a shot of whiskey and decided that your pattern is as good as it's going to get, trace it onto a piece of leather with a soft pencil. Leather has a natural grain, just like fabric has a woven grain.So leather has a "straight" and a "bias" just like fabric does. You can generally orient yourself with the grain of a given piece of leather by looking at the natural stretch marks and lines in the leather. (If it's thin enough, you can gently pull it to find the straight and bias. Your stays leather will likely be too thick for this trick, though.) Ideally, cut the stays on the straight of the grain. "Give" is good, "stretch" is bad.

After you trace the perimeter of the pattern with the pencil, go over it slowly several times with the razor. Over, and over and over and... you get the idea. Don't try to save time and cut really deep the first pass or two! This is where it's important to be patient. I scored the leather with the blade about 10 times. Each pass, I cut a little deeper.

Kind of a Batman thing going on here...

And thus, you shall free the stays from their moorings. Next, cut the slits between your tabs (unless you're a rock star and you already did that as you were cutting the rest of the stays out). Mark the placement of your lacing holes. Again, reference originals for lacing patterns and hole placement. Spiral lacing was commonly, but not exclusively used on 18th century stays.

 Try to cushion the awl with some leather scraps. Also, only do this on your home floor if you live in a shanty like I do.

The holes should be positioned at least 5/8 of an inch from the back edges of your stays. Any closer, and you risk tearing the leather if you lace them tightly and wear them often. Mine were a little under 1" from the edge.


 These were the original holes...


 ...And this is what they look like today. (More insight on this change in Part 3)


 Learn from my mistakes: See how the holes go alllllll the way down? They really shouldn't. The lacing holes for your stays should not go past the point that the tabs start.


And you know what? You just made leather stays.


Or maybe you watched me make leather stays while you ate Edy's. Either way, good for you!

Next up: Finishing the stays, final fitting issues and other horrors!

Leather Stays Tutorial Part 1

Leather Stays Tutorial Part 3

Friday, January 27, 2012

Simple Stays: Leather Stays tutorial, Part 1

 What my stays look like today, after about a year of use.

As promised, a post on the making of my leather stays!

Except that I tend to ramble incessantly, so it's going to be more like a few posts on the making of my leather stays. Kelsey at Historically Speaking is currently working on a set of leather stays for herself using the Mill Farm pattern as a base. I only recently found her blog and was delighted to see someone undertaking leather stays. Inspired by her lamentations on the lack of love for leather (see what I did there?), I decided to document my own experience for the Good And Benefit Of Humanity.

My leather stays were constructed over the course of a few days in early 2011. If you have ANY experience drafting conventional stays or corsetry, you could probably make them from scratch in about 5 hours. Cost is equable to, or even less than traditional stays, depending on what you already own and how accurate you want to be.

Without parroting Kelsey's observations (which I agree with), leather stays are grossly under-represented in the 18th century reenacting and historical costuming communities. Part of the problem is that there just aren't many extant pairs compared to the plethora of traditional boned and reeded stays. But I think a great deal of the issue is that many people are intimidated by the idea of making their own.

It's not hard. It just takes a little patience and some planning.

Before we get started, here's a list of what you will need for your own leather stays, if you want to do things the way that I did:

* A nice piece of leather, consistent in thickness, at least 8 oz. (The leather I used was around 11-12 oz. and was purchased at a Tandy Leather.)

* A piece of something thick and disposable for the mock-up.

* A busk. (Anything rigid will do, including the ubiquitous paint stir stick.)

* The heaviest thread or cord that you can successfully cram through the eye of the biggest needle you've got.

* A clear ruler and a measuring tape.

* A dark colored marker

* A pencil

* Brown craft paper

* Vellum or wax paper (you just need to be able to see through it enough to make out shapes)

* An awl (and if you're a wimp, a hammer.)

* A box cutter and a nice selection of new blades

* Scissors

* Heavy twine or thin cord

Things that you need to have access to:

* A place to do lots of cutting without compromising the integrity of your home or furnishings.

* A cat, so that you can be adequately distracted while painstakingly slicing through an expensive piece of leather with a fresh razor.

* A pattern or a plan.


 Got all that? Great! Here we go.

I drafted the base of my pattern using Drea Leed's Elizabethan corset generator. If you haven't checked her site out, go do it. (According to the proprietary information on the site, she hasn't messed with it in close to 4 years. But it's solid gold. I hope she updates it one day.) So the generator! Follow the instructions, and make yourself a pattern.

Ta-da! Totally NOT 18th century!

The generator does just what it says. You'll have a rough mock-up of a quasi-Elizabethan-looking bodice. And that's okay, because the silhouette of the 18th century was born out of something similar to what you've just drawn. Now comes the creative part! Using pretty much any set of stays you like as inspiration, correct your pattern with the 18th century elements that best reflect your preferred part of the century, location, etc.

 These are American, 1725 and made of cotton. From the Met.

The pattern you've drafted represents 1/2 of a finished pair of stays. Hold it up to your body and see what adjustments need to be made. Take note of where the bust line of the pattern hits you, and the curve of the hip notch. Elizabethan silhouettes were tubular (radical!) versus the conical silhouette of most of the 18th century. Keep that in mind as you make adjustments. You will probably need to lower or widen the bust line, and shorten and/or widen the base of the center front. Lay your vellum or wax paper out over the paper pattern you've created, and use a pencil to re-draw the pattern. Add the tabs (if your inspirational stays have them) and create the shape of the bottom front.


Things to keep in mind as you draft your new pattern: Don't keep the front overly pointed or low at the bottom. (Hard leather, cut to a point will NOT feel good pressed into your stomach or other sundry organs.) Remember that leather stays are meant to be common garments for working women. You can use fancier stays to model your pattern, but keep in mind the utility of the garment.

I went ahead and folded my wax paper so that I could have a full pattern to use for the mock up. I had already determined that I wanted my stays to be back-lacing. If you want yours to have front-lacing capabilities, just adjust the pattern accordingly.

The next step is tracing the wax paper pattern onto the material for the mock-up.

 It's really important to find something that "acts" like your leather. I used a remnant of synthetic suede upholstery material and it was GREAT. The thicker, the better! If you can find enough of it, consider using fun foam sheets (or whatever it's called now) from a craft store. If at all possible, try to use something that you don't have to piece together. Your stays will be cut in one piece from your leather. The mock-up needs to be as similar to this condition as possible.

Pardon the toes. I am not a small-footed woman.

And then cut! Cut for your very life! You can see here (at the bottom) that I originally cut a rougher, fuller shape for the base of the stomacher area and the tabs. After they were completely cut out, I went back and refined those areas to suit my taste.

 Sorry for the lack of contrast. Conditions were neutral.

Next up: Fitting the mock-up and chopping into the leather!

Side note: The pictures from the construction process are all from my old cell phone. The quality sucks, I know. Plus I didn't get pictures of every step. If anything seems unclear, feel free to ask questions.

3.24.13- UPDATE! I never linked to the follow-up posts. Here ya go:

Leather Stays Tutorial Part 2

Leather Stays Tutorial Part 3

Friday, January 20, 2012

Well, I'm poorer but...

THIS is now mine:


I've wanted this book since before the only people who cared about the "Kardashians" were folks who just couldn't let the O.J. Simpson trial go.

It's been on my Amazon wish list for a while in the original hardcover printing. Back when I added it, the book was selling used for about $160.00 on a GOOD day. I work at a book store and appreciate the value of the printed word well enough, but $160 for a single book is a major life event for me. (For me and my neighbors. As it turns out, I live in one of the top 10 most impoverished states in America. The statistic also reflects obesity rates and education ranking. So we're winning at being poor, fat AND stupid. But it's nice to be in a top-10 list of any kind when you're from South Carolina.) I started saving money to buy one, then noticed the price dropping on the hard backs last year and fortuitously found out that a paperback reprint was due out this year! The official release date is February 28th, 2012, but apparently the publisher didn't get the memo because I'm holding my copy right now. 

Final price? Under $30. This is good for a lot of reasons, but namely because it's a fantastic source and now it will be readily available for a new generation of collectors, seamstresses, reenactors and historians. And people who have a fetish for large books with waistcoats on the cover.

Second Boo-Yah of the day concerns the purchase of fabric. Tax season is a good time to buy fabric, if you've got the capital laying around. Great sales abound in-store and online. I love Fabric.c*m for the variety and general value, but it's like a giant flea market over there sometimes. You never really know what you're going to find.  It's been admittedly dry lately, and I had half a heart to disregard the pleas of the petulant nymph pimping a pile of cotton novelty prints in their recent email advertisement. I'm glad I didn't. They currently have a remarkably good selection of wools (some blends in there, but a lot of 100% too) including some great olive green wool melton for under $4 a yard, and several lovely twills and merinos for under $7 a yard. 

So yes, there shall be wool via FedEx as well as some necessary osnaburg. I am in the last leg of the Dreaded Jehossee project and I ran out of osnaburg a few weeks ago as the direct result of making "rustic goat pillows" for unsuspecting friends and family for Christmas. I got yer Christmas present right here...

Upcoming: I will attempt to post some pictures and notes regarding the construction and patterning of my 18th century leather stays in the upcoming week. A fellow blogger is making a pair of her own and lamented that nobody has documented leather stays as of yet. Surely more people have made them? Anyway, that's all the news that's fit to print for now.

Sunday, January 8, 2012

Mansfield Snark plus Ambitions of the Sewing Sort

I do not profess to be a hard-core Austenite like many of my esteemed comrades in the Chicks Writin' About Historical Fashion Club, but I like the lady. Truthfully, I had not read the entirety of a Jane Austen novel until a year ago. But rest assured, the gates of Heaven opened, rays of sunlight fell upon my face and a chorus of Angels droned enthusiastically in refrain when I finally did my duty and read Northanger Abbey.

And WHAT a great book! I have been utterly conquered. Love of La Austen delivered me to the many movie adaptations in addition to the novels themselves. While the hardest to watch is a dead heat between Persuasion (2007) and Mansfield Park (Billie Piper, 2007), I have to say that in general, Mansfield Park seems to make a more wretched movie. Most of the adaptations of that novel are awkward and the heroines vacillate between insipid and unlikable. Internet consensus among the blogs and websites I've trolled seems to agree.

Billie Piper: Freakiest Maw in Show Business. Here, she seems to be thinking "What IS this that's going on with my teeth??" Photo courtesy of Wiki.

Naturally I assumed that I'd hate Mansfield Park the book as much as I failed to enjoy the films. When presented with the opportunity to do a semester-long project on the book for an English class this past semester, I agreed. It was perhaps the only way that I'd get around to reading the book. And read it I did. Over, and over and over again. (Oh, how I do NOT miss you, Lit. Theory)

But shockingly, I liked it. And not only did I enjoy the book, I really liked Fanny Price. Sure, she's no quirky little Catherine Morland, but she is a powerful character. She's funny, sweet and she has a sharp wit when needed. The most common assault on Fanny seems to relate to her inability to think for herself, yet more than any other Austen heroine, she does just that. The subtlety and wry nature of her intelligence and wit are evidenced in her ability to annoy her Aunt Norris in spite of seemingly agreeing with everything the older woman says.

And more than that, one gets the impression that Jane Austen herself perhaps appreciated the physical and social limitations of a character like Fanny Price. Fanny shared some of Jane's own life experiences and strongly reflects elements of Jane's brothers and sisters as well. If Fanny is to be ridiculed for failing to claim what she wanted whenever she wanted it, then ALL of Jane Austen's heroines should be equally ridiculed. Even that hallowed bastion of Pride and Prejudice, Elizabeth Bennet didn't announce or follow her intentions and desires outright. Furthermore, unlike Elizabeth, Fanny didn't waste a moment in pondering her heart's desire. She always knew her own heart.

The above soap-box is all to say that I plan to earn my Historical Fashion Blogging chops this year and make the ubiquitous Regency dress. I've never made one before. This isn't the first project on the horizon, though. For the year I must:

*  Finish all of the Jehossee stuff. (Due within a few weeks. Tick. Tick. Tick...)

*  Make an English round gown (or something equally excellent) for a symposium on 18th century fashion I'm supposed to participate in.

*  Finish my beloved linen and cane stays, which have languished for nearly six months without binding or attached lining. Based on these, which are my favorite stays ever in the history of the world:

Philadelphia Museum of Art. 1725-1750.

*  Make another couple of 18th century petticoats because I've got the fabric and it needs to be evicted from the stash.

*  Make an 18th century quilted petticoat. (I eagerly anticipate the day that the roll of wool batting is no longer in my closet, seducing moths.)

*  Make a more accurate Civil War dress and perhaps a few accessories to wear for 150th Anniversary events around town.

 Metropolitan, Costume Institute. 1860.

*  Make a bloody Civil War era corset. WOW do I ever need to do this. One more turn at a battlefield in my clearance rack Victoria's Secret finery and I may have to call it quits. For those interested, YES, it's possible for a corset to wear out. Just like a bra. Only worse and with more poking.

*  And waaaay down here is a lovely little Regency gown. I purchased some window-checked silk a year or more ago that is destined for this dress. I plan to practice putting it all together before I cut into the silk. My dry run will hopefully yield  a second, simpler frock. It shall be rendered of a reasonably passable roller print-style cotton.

 Metropolitan Museum of Art, Costume Institute on both of these. 1804-1814.


And then there's the little issue of having no undergarments for Regency fashions. Hmm...

Friday, December 23, 2011

This is not news. This is the opposite of news.

But the National Trust (UK) online Collections are available for the interested to peruse.

As luck would have it, interested I am and peruse I did! So to contribute to the Greater Good and Understanding of Mankind, I present: Pictures Of Pretty Stuff I Got Off Of A Globally Accessible Website Which Anybody Could Go See For Themselves Virtually Anywhere Else.*

*Available for a limited time only. If by "limited time" you mean "indefinitely."

Since I have less than a month to finish hand-sewing a ridiculous number of garments and accessories for the Jehossee 1850 project, naturally I'm spending hours at night trolling the internet for completely unrelated things.

 Stays!

 These are fascinating! Despite the rather vague "1750-1800" date assignation, they have a lot of character. The ties in the front separate a DIVIDED busk and the peaks on either side of the underarm curve (front and back) have holes punched (and presumably finished) for linen straps!


 French in origin. From the Snowshill Collection. The original sleeves are in the archives as well! This would have been a show-stopper. (1735-50)


 French, 1700-60. This was possibly modified from a stomacher. The description suggests that it was "let out" when the "backs were added."


1700-1800 (really?), Smallhythe Place Collection. The ornaments in the center of the bows are cut-steel. And they rather look like modified clasps, don't they? 


 1750-1800. (Why are some confidently "1750-1799" and others MUST be "1750-1800"?) The busk is crafted of layers of canvas and is described as "diamond" shaped. The fluttery bits of pinked material under-arm is chamois leather.


 Totally my favorite of the lot. They remind me of the Effigy Corset of QE1 as well. You? 1750-60, Snowshill Collection.


 1700-1750, Snowshill Collection. These are described as "possibly homemade" which causes me to wonder if each of the other pairs are presumed to have been crafted by a Staymaker? Love that color!


 1770-1799, Snowshill Collection. These are so unerringly precise! The diagonal bones on each side of the center front are steel, which is nifty. I dig the square tabs as well.


 And as a grand finale, a lovely stripey zone-front from among the many beautiful gowns and fragments on the site:


Really, if you are somehow even more backwards than I am and haven't ventured over there yet, go check it out. The search function is great (I'm looking at YOU, Costume Institute...) and while there isn't a great deal of individual information available for every single item, among what IS presented, the collections are interesting and well-photographed. 

(Yeah, I don't know about that last sentence either.) 


Have a beautiful Christmas!

Monday, October 31, 2011

Because these stays are just really, really cool.


Seriously? These are amazing. Look at the phenomenal engineering that went into these! Aside from being the duck-billed platypus of the stays universe, they are just plain intriguing. This was someone's Guggenheim. Or at least their Bat Utility Belt. Every square inch is dedicated to an element of function or support. (Boo to the cross-lacing though.)

Sorry, but I can't remember the date range that the Met ascribed to them. I assumed that they are rather late 18th century, maybe in the 1780's-90's?, but I have no clue. Shame on me for not saving pertinent information along with my costume porn.

I wrote a particularly eloquent email to the good folks at the Metropolitan Museum of Art regarding the new costume search function. I know, I know. But sometimes, when I'm up in the middle of the night roaming the house for proof of my own existence, nothing will do except to rant at faceless institutions. Sort of like Matlock did in every episode, but through the power of the internet instead. I expected to be ignored because they are the frikkin' MET.(And because my email address pretty much lands me in the Spam folder everytime.)

But then they went all weird and actually ANSWERED my email! Like I'm a PEOPLE or something! I have been celebrating in a quiet way all week. For those who yearn to know the sordid details: I was reassured in the strongest tones that I am, in fact, the only person who has had difficulty finding what they are looking for whilst using the new search function. Furthermore, a child could use it. Better still, a monkey's child could use it. (I am making most of this last bit up.) But the respondent helpfully provided directions on using it properly which worked about as well for him as it did for me. He suggested after a less-than-awesome demonstration that they were still "working out the kinks." 

Touche, Met.